Since GLPI 10, we have added three new tools for companies willing to manage and keep track of security and investments on IT assets like computers, servers, monitors, printers and, software programs, for example.
Companies of various sizes must manage the assets, so they might plan correctly the lifecycle of purchase, usage, maintenance and/or disposal correctly and effectively. Imagine if an IT department can keep track of the number of computers or monitors there are to be fixed and how many should be bought the next year.
Native GLPI Inventory
The native inventory is the fundamental functionality at the heart of GLPI. It acts as a central hub for managing and tracking IT assets, covering everything from hardware and software to user accounts and basic inventory information.
You will always start here. The native inventory serves as the foundation, addressing basic inventory needs like tracking the number of computers that need attention or planning for new hardware acquisitions.
The GLPI Native Inventory lays the groundwork, providing the essential structure for all things asset management in GLPI.
GLPI Inventory Plugin
Think of the plugin as an extension that enhances GLPI's inventory capabilities. It steps in when you require more advanced features such as detailed hardware and software information, network discovery, and robust reporting – ideal for medium to large organizations with complex IT infrastructure.
You will deploy the plugin when your IT landscape becomes intricate, demanding network discoveries, scheduled tasks, SNMP inventory, or software deployment. It's the toolkit for handling the complexities of a dynamic IT environment.
The GLPI Inventory plugin expands GLPI's functionality, introducing advanced features and additional capabilities beyond the native inventory.
GLPI Agent Toolbox
The GLPI Agent toolbox introduces an agent software deployed on client devices to collect detailed information. It serves two primary purposes: replacing certain GLPI Inventory plugin features like network discovery and inventory support via scheduled tasks, and providing real-time data from devices in challenging network environments.
You will turn to the toolbox when you need to supplement or replace features provided by the GLPI Inventory Plugin, particularly in scenarios where direct GLPI access is restricted, such as strongly segmented DMZs or isolated VLANs. It's your go-to for detailed, real-time information and proactive monitoring.
The toolbox offers more reliable inventory data, more tools to manage inventory tasks, reduces manual data entry, facilitates proactive monitoring, supports remote inventory and tasks in isolated or secured network environments.
When to Choose
The native inventory is the cornerstone, always part of your GLPI infrastructure. The GLPI Inventory Plugin and GLPI Agent Toolbox are able to extend some GLPI's capabilities to address advanced tasks, such as network discovery and inventory in segmented DMZs and VLANs, and provide solutions for restricted or challenging network environments.
Your choice depends on your organization's specific requirements, the complexity of your IT infrastructure, and the need for enhanced features that go beyond the native inventory's capabilities.
When we speak about IT asset management, ensuring the efficient tracking and management of your organization's hardware and software assets is paramount. The GLPI Agent, an essential component of the GLPI Inventory ecosystem, is your ally in achieving this. In this comprehensive guide, we'll explore the GLPI Agent, its importance, and a valuable toolbox plugin that allows administrators to manage tasks locally without the need to create them on the GLPI server.
This is especially valuable for complex networks where installing agents on every computer may not be feasible or when security and compliance reasons restrict server connections.
Understanding the GLPI Agent
The GLPI Agent is a powerful tool developed to simplify the challenges associated with IT asset management. It facilitates the collection and transmission of vital data from connected devices to the central GLPI Server. This continuous flow of data empowers organizations to:
Maintain Real-Time Inventory: With the GLPI Agent, you can keep an up-to-date inventory of your hardware and software assets. This real-time snapshot is crucial for making informed decisions.
Reduce Downtime: By having a clear view of your IT assets, you can minimize downtime by addressing issues proactively and efficiently.
Optimize Resource Allocation: Resource allocation becomes more efficient when you know exactly what you have. This leads to cost savings and improved productivity.
Enhance Security Protocols: Security is a top concern in the IT world. With the GLPI Agent, you can better protect your assets by staying informed about their status.
Compliance and Licensing: For organizations that need to comply with licensing and security requirements, the GLPI Agent is a valuable asset for maintaining compliance.
Introducing the GLPI Toolbox Plugin
One of the standout features of the GLPI Agent is its toolbox plugin. This plugin allows administrators to manage tasks locally, directly from their computers, without the need to create tasks on the GLPI server. This feature is particularly valuable in scenarios where:
Installing agents on every computer is not practical.
Security measures or compliance regulations prevent direct server connections.
Since the version 1.6 some new and important features were added to the Toolbox plugin like:
A dedicated page to schedule tasks — you can also setup the tasks to run on a daily basis or in blob times ( e.g.: every hour, or every three hours)
A dedicated list of inventoried devices — when using the Agent Folder as the target of the tasks
New layout of icons and buttons
A wider range of credentials and IP ranges administration for Remote Inventory and ESX Inventory support.
To help you get started with the GLPI Toolbox Plugin, we've created a video tutorial. In this video, you'll learn step-by-step how to set up the toolbox plugin for local task management and also how to create a scheduled task. This visual guide will make the process easy to understand and implement, ensuring that you can efficiently manage your tasks without unnecessary server interactions.
00:00 - Introduction to GLPI Agent Toolbox Plugin 02:15 - Installing the GLPI Agent on Windows 03:57 - How to activate the Toolbox plugin 07:27 - How to enable menus inside the GlPI Agent toolbox plugin 07:53 - How to create inventory tasks using the toolbox plugin on GLPI Agent 11:24 - How to import the inventory files to my GLPI Server 14:04 - How to convert an unmanaged device into a computer in GLPI
At Teclib´ we are happy to announce that we are expecting the release of GLPI 10 in the following weeks. We have received many questions related to migration from older versions of GLPI/compatibility of plugins and decided to publish a dedicated video. Watch it on Youtube or read the transcription below.
From which GLPI version I can migrate to GLPI 10?
You can migrate to version 10 from any GLPI version (we support migrations from at least 0.80 version), all data, like users, tickets or assets, will be transferred.
What should I consider before migration? Which data can be lost in migration?
The server must have at least PHP 7.4 and MySQL 5.6 dependencies. If your server doesn’t have these, you must upgrade these requirements.
No data loss is expected, but as usual, make backups (files and database) and/or snapshots.
You will need to execute some optional migrations after GLPI main update with the help of the console.
If you have custom developments or core changes, please note they will be erased when copying the files. Consider porting them before the migration.
Which plugins will be compatible with GLPI 10?
All plugins listed in GLPI Network Subscriptions (both Community and Exclusive ones) will be compatible with GLPI 10.
In addition to the small gain of not using a plugin, the feature will use less history data and database storage (for example, software updates take 1 line instead 2).
We worked also on user experience, you have now assets separated by types for a more comfortable setup.
It unlocks some features like partial inventories, which reduces performances footprint.
More asset types are available for inventory (you can send files for racks, appliances, certificates, etc).
In combination with GLPI agent, you also obtain some great features:
Databases inventory
Proxy mode for DMZ
Remote inventory (agentless) for windows and linux.
Stand-alone SNMP tasks
Our professional support for on-premise (GLPI Network Subscriptions) covers support L.3 for migration from GLPI 9.5 to GLPI 10.
All GLPI Network Cloud paid customers will be upgraded for free.
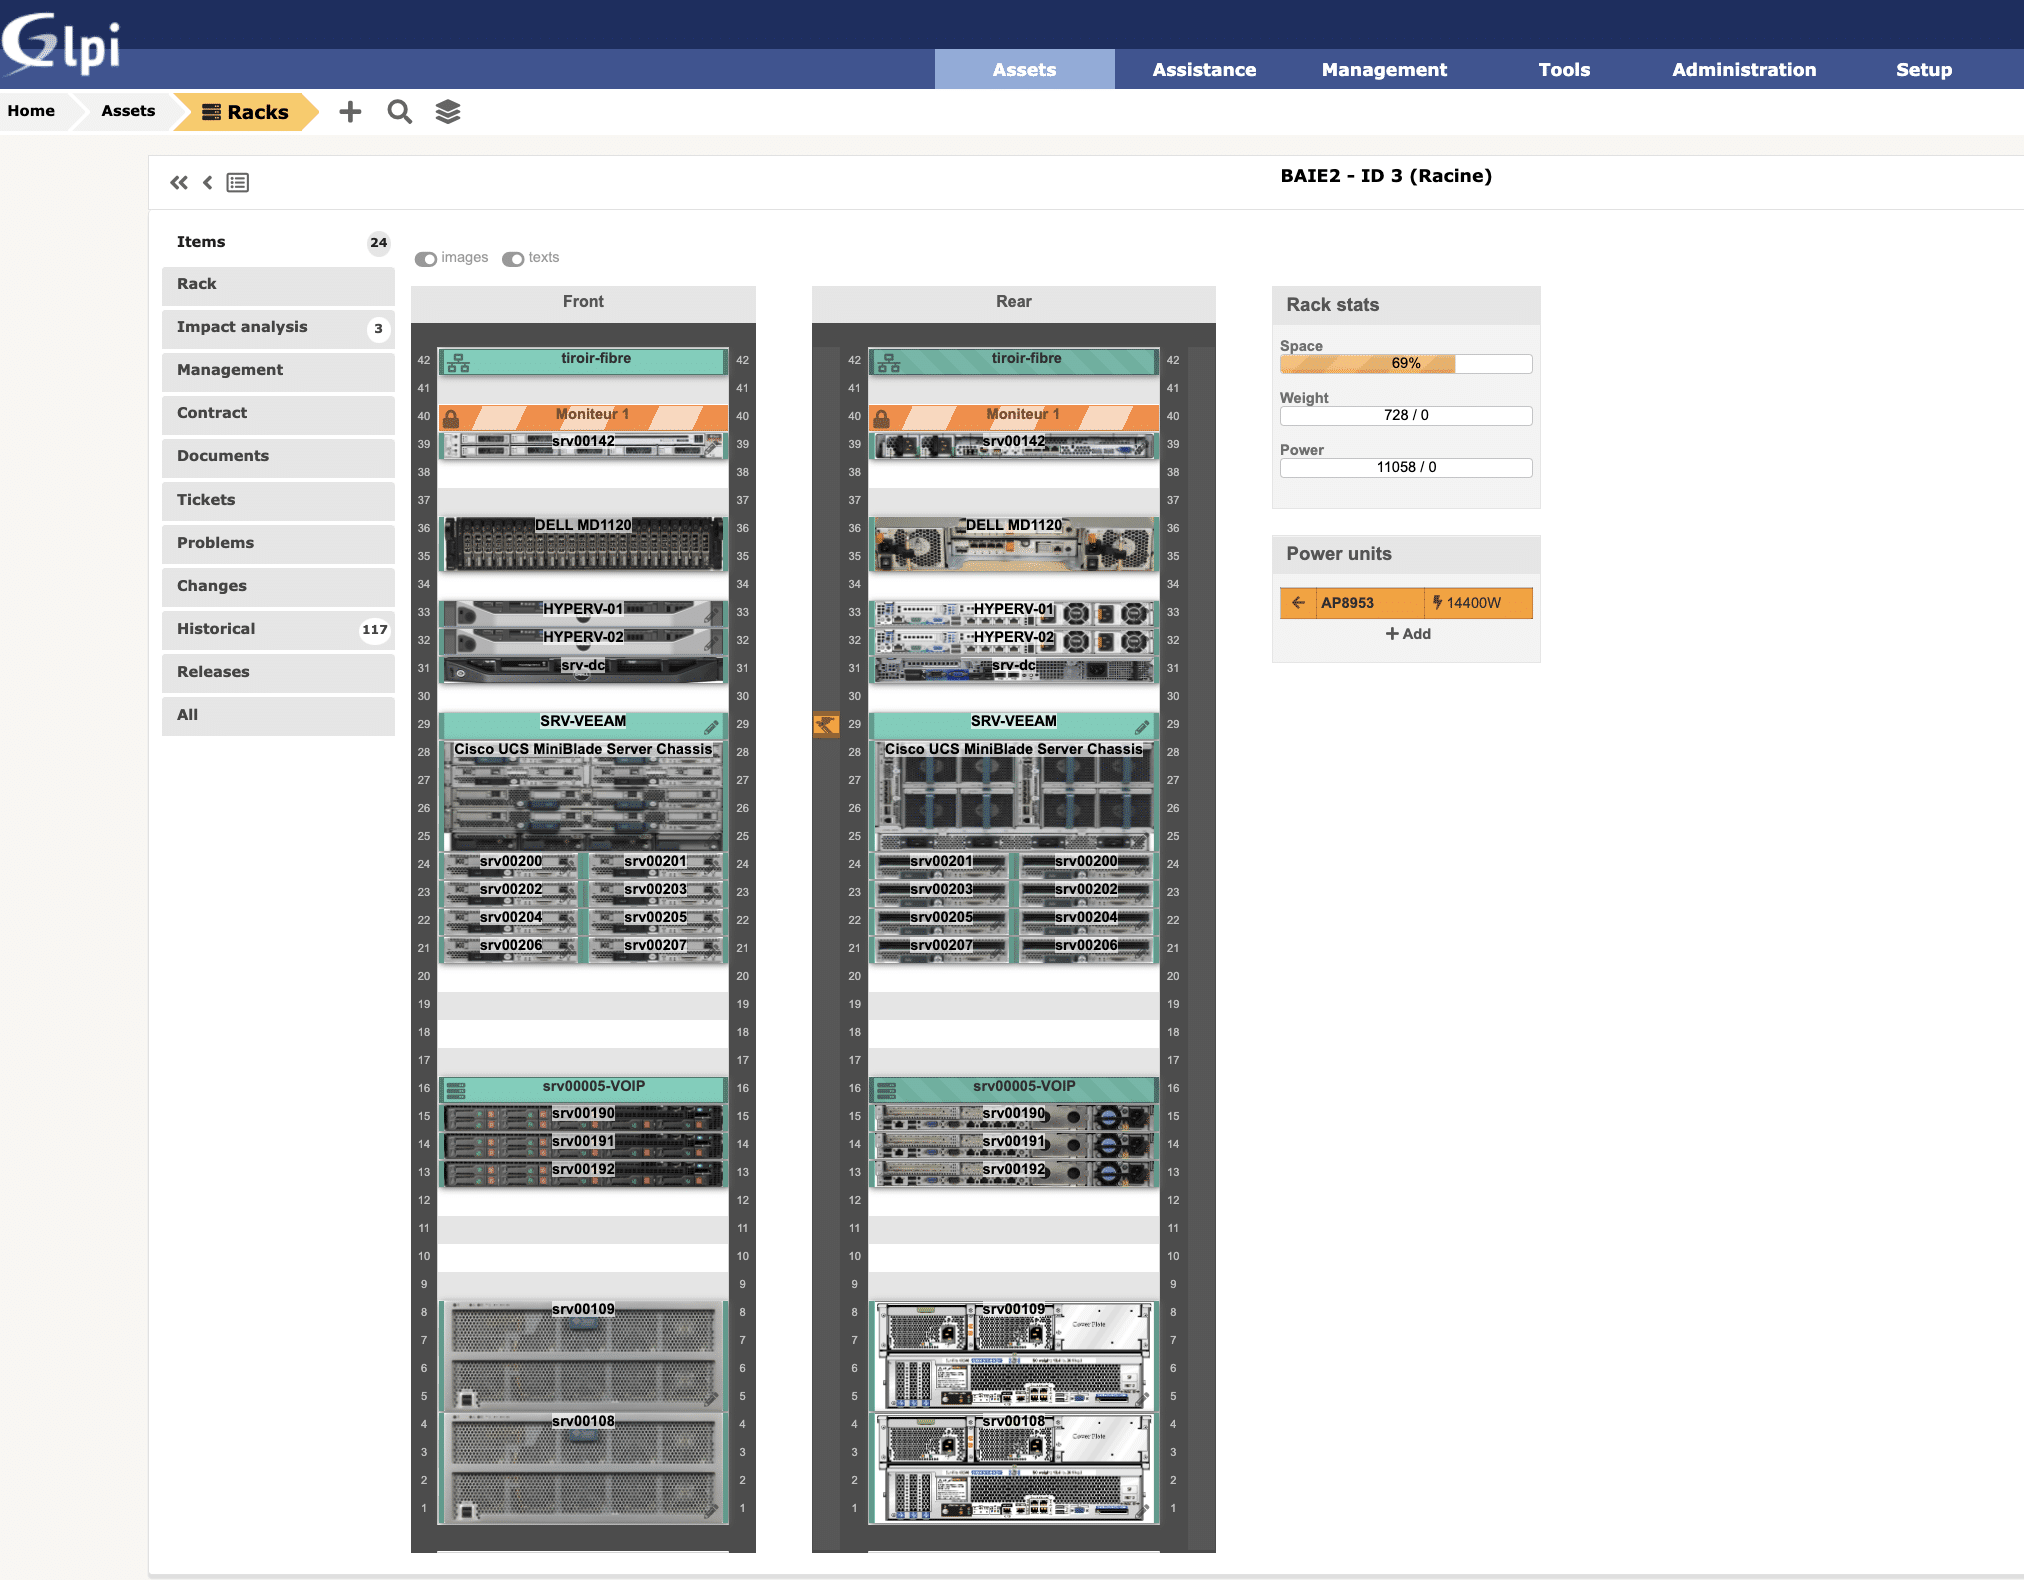
Starting from the GLPI version 9.3 version rack management feature was integrated to the system’s core. Improvements in its design were also made, giving a more realistic touch to the items when assembled, giving us the possibility of having something similar to the following image:
Assembled rack in the GLPI’s rack management module.
Like every other thing in GLPI, the racks are basically configuration items that can be added and managed inside the system.The biggest difference, in this case, is that the management goes further and allows us to have the graphic vision of how the configuration item is developing.Although having the true and graphic vision of the configuration item’s representation isn’t mandatory in any standard, the possibility attracts users who likes to know how the services are being delivered and also facilitates the decision making for analysts and managers
What’s a rack?
Racks are structures, normally made of steel to accommodate IT equipment such as servers, switches, cable panels, among others.They have an importance both from the aesthetic point of view, making everything more beautiful and organized, as well as safety-wise, making IT assets inaccessible to people with access to the same environment as the rack.
Why use a rack?
Racks are used to help organize and also protect the physical structure of the IT components, whether it’s assets (equipment) or liabilities (structured cables).It can also have distinct purposes in a organization, or even mixed, depending on each necessity and capacity:
Hold network servers;
Telecom equipment;
Network assets such as switches, routers, wifi controllers, among others;
Telephony equipment;
Structured cabling;
Or even a mixture of some of these items or all of them at once.
In bigger organizations, it is common to have multiple racks, one designed for each function.
Telecom racks;
Server racks;
Since they have a bigger footprint, purchasing power and infrastructure’s complexity level, they segregate their resources in order to elevate the safety and management levels.
These are the two most popular types of racks in the market:
Floor rack: Rack with feet to be installed on the floor;
Wall rack: Rack without feet to be installed on a wall by its inferior part with the use of fastening screws and bushings.
Of course, there are other types of racks such as two-door floor rack, with side doors, and many more characteristics. But it’s up to each organization to know to what level to spend resources to manage the asset’s characteristics.
To create rack types on GLPI, you must proceed as follows:
Step 1: Access “Setup > Dropdowns > Types”Step 2: In the session “Types”, look for “Rack types” and click in its linkStep 3: Click on “ Add a new item” and register your new rack type.
What assets do can you place on racks?Beyond the network and server assets, the racks also tend to accommodate accessories, which are called liabilities.The most used and, consequently, most known liabilities are:
Patch panel;
Cable guide;
Blind cover;
Tray.
> Patch panelCable panels or Patch panel as they are popularly known in the technical niche, are panels used for the arrival of structures cabling, having connection sockets in the RJ45 standard to provide the connection of Terminal Points (which arrive via structured cabling) to other network devices inside and outside the rack.For the interconnection of the devices, whether assets or liabilities, small cables of variable sizes are used, which are known as Patch Cords, as the images above and below represent:> Cable guideThe cable guides help us organize the patch cords inside the racks, so that the rack doesn’t look like “drained noodles”, a very common term for when the cables are loose and unorganized.> Blind coverThe blind cover has the goal to block the view of the rack’s interior. It is an interesting item to keep the rack beautiful and organized.> TrayUsually, we have assets such as small routers, carrier modems or devices such as midia converters that we need to put in the rack for safety and even convenience reasons.The fact is that these devices don’t have 19’’ of width and so they can’t be conventionally fixated on the rack. Therefore, we need a special resource to keep them organized.This resource is the tray.There are various types of trays:
Fixed: after the installation, movement isn’t allowed;
Slider: they have lateral slides/tracks, allowing movement to the outside of the rack.
It’s also common to buy trays that occupy only half of the rack’s depth, enough to serve us for specific use and a limited amount of equipment.
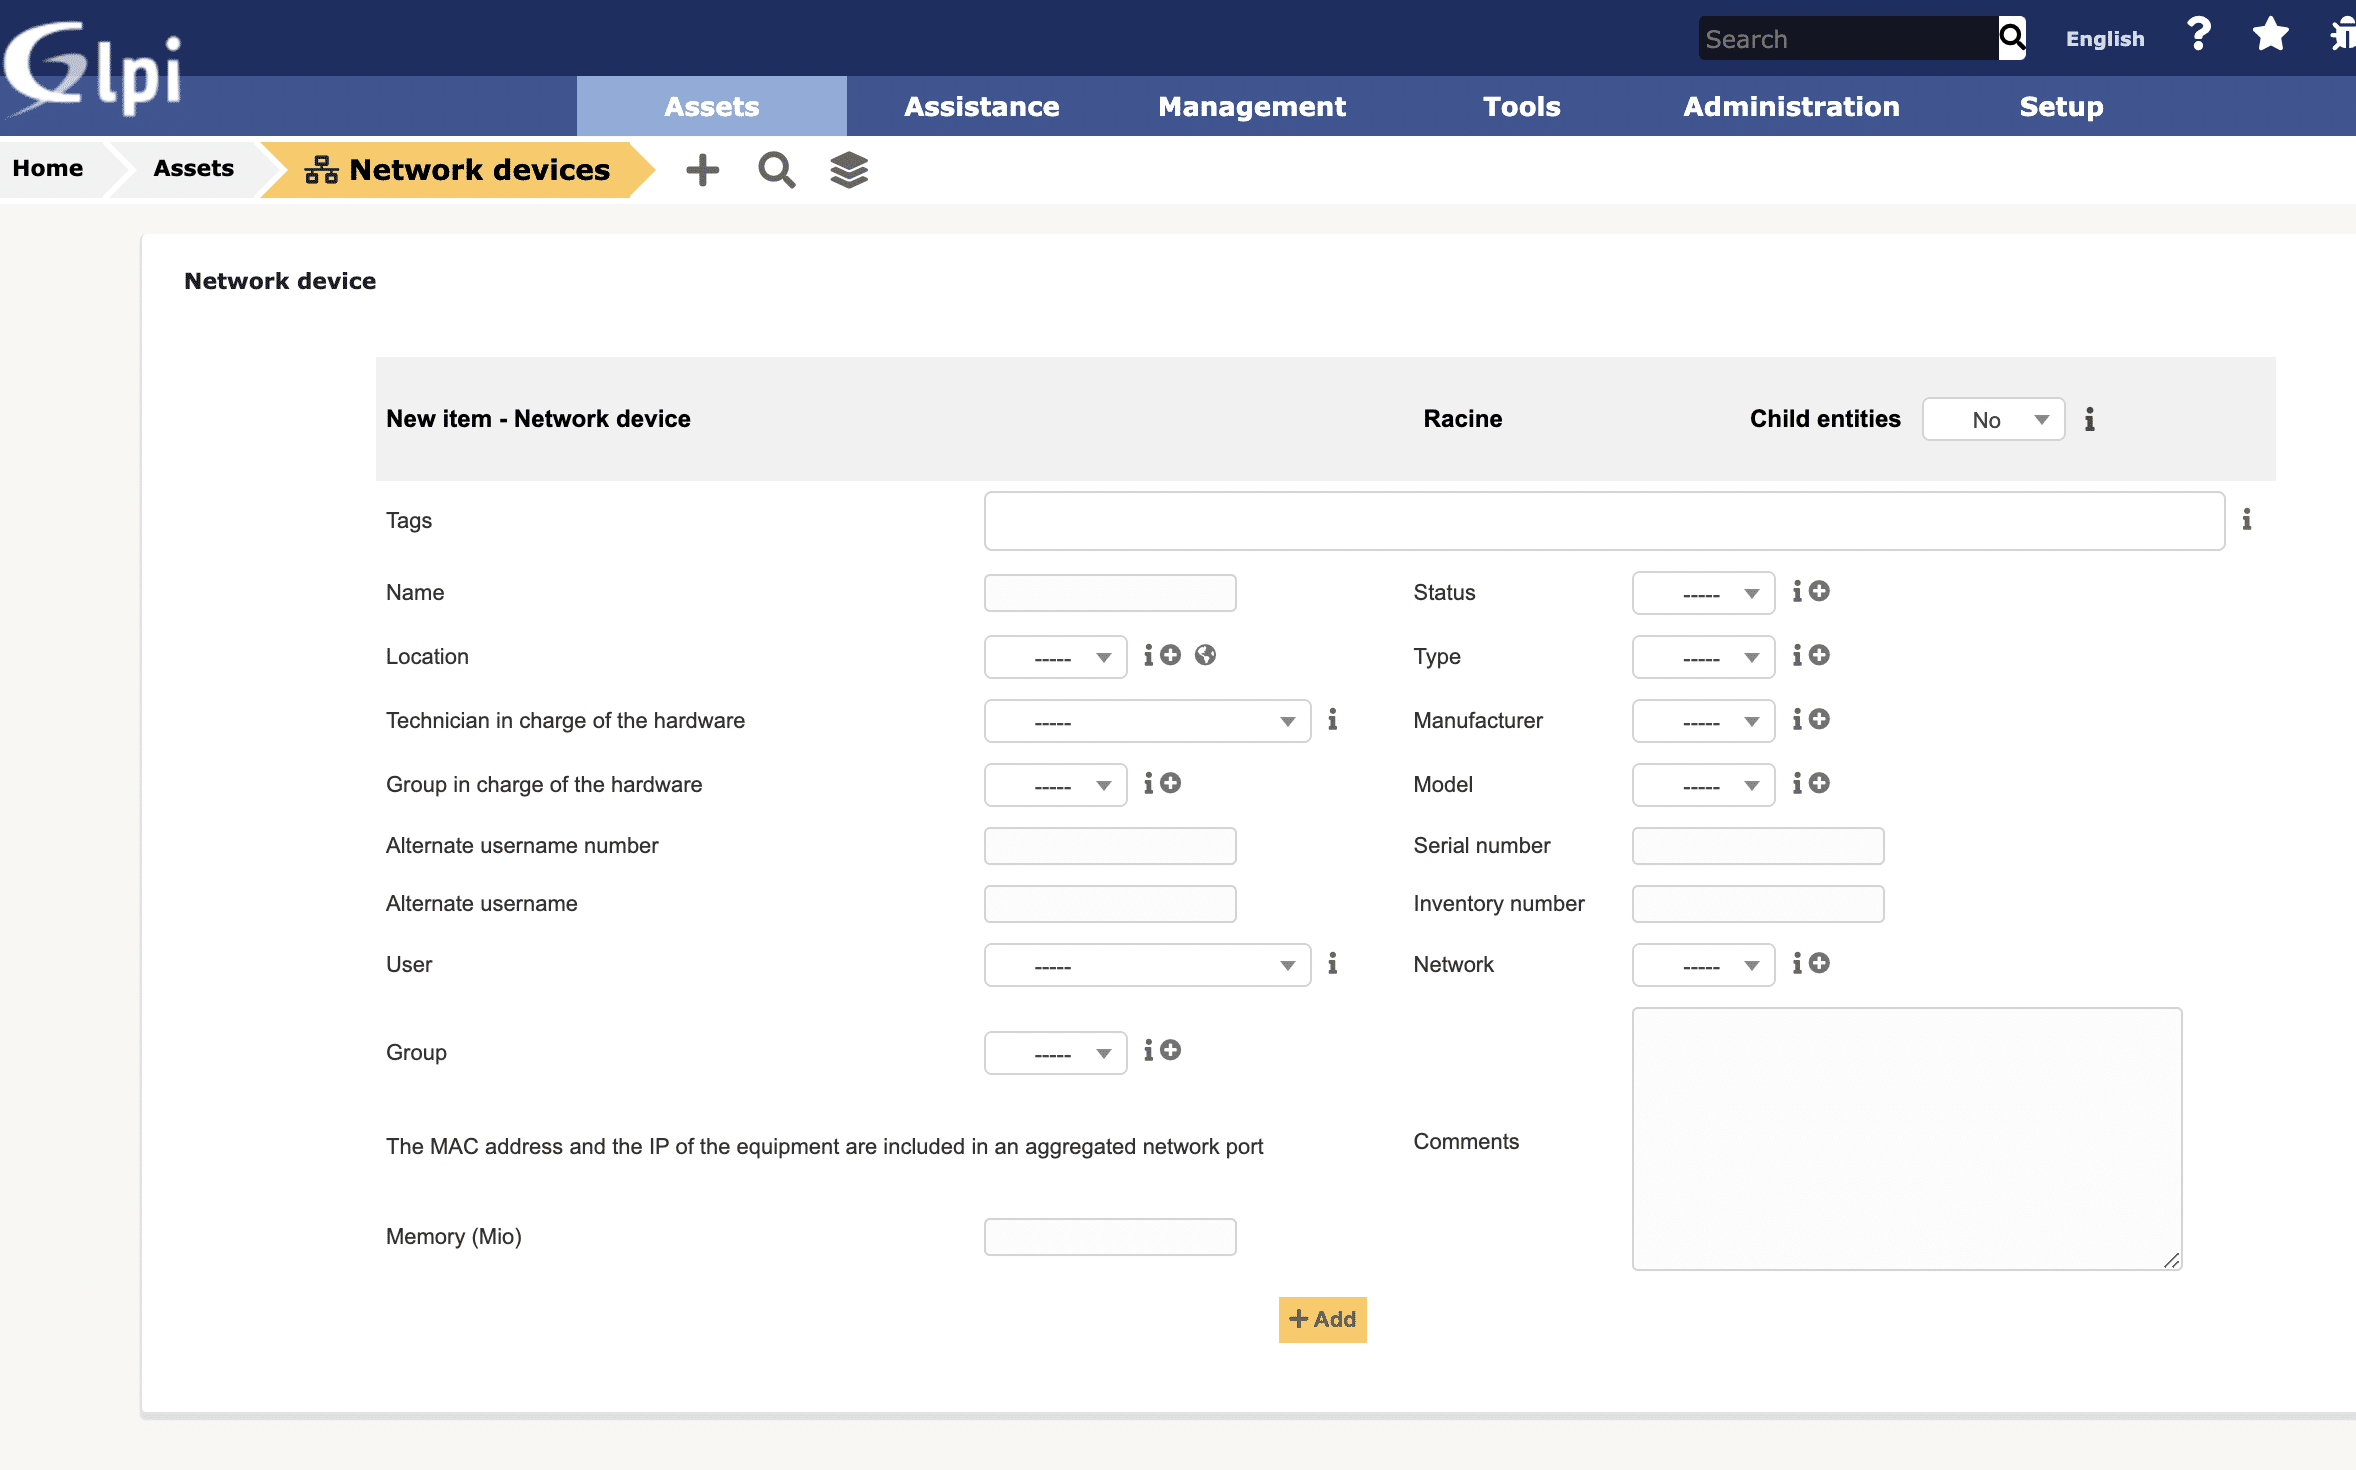
Creating network devices on GLPI.
Starting from GLPI 9.5 version it is possible to create network devices in the system. To do so, please, follow the instructions:Step 1: Access path “Assets > network devices”Step 2: Click on “Add item”Step 3: Register the network
Commonly used assets on racks:
What we’ve seen so far were just configuration items of the liability type. Now, we will quickly see the main assets:
Switch
Server
Firewall
UPS
> Network switchSwitches allow the interconnection of lots of devices via network, such as computers, routers, servers and others that use network connectors. We won’t get into types of network connectors in this article. It’s already going further than I thought it would earlier today.> ServerRegarding servers, the market supply is as diverse as possible. We have cabinets of various models. But what interests us in this moment are the following:
Rack server: appropriate cabinet to use on racks
Micro server: a small server developed by HP for micro organizations.
About the rack servers, what we can add is that they have several sizes, both in height (measured in U, as we’ve already seen) and depth (it’s necessary to check if the rack also has enough depth). In some rare cases, the server itself doesn’t have 19’’ of height, but comes with mounting accessories that allow its use and correct fixation in the racks.> FirewallFirewalls are items found commonly on racks. That’s exactly where they tend to operate: the edge of the networks!Today, we’ve been finding a range of firewalls on the market varying in manufacturers, models, sizes or even type:
Physical:
Box bought with the manufacturer;Software installed in server hardware.
Logical:
Running it in a virtual machine inside the server.What interests us here is only the physical, sold in a standard cabinet from the manufacturer and most of the time, installable on racks.> UPSOur next item is the UPS. It’s responsible for ensuring a certain continuity of equipment operation when there is a failure in the power supply.There are several equipment models and shapes, but these details don’t fit in this post. What interests us is just the affirmation that some models are proper for installation on racks.>Ruler, the must-have itemAnother item that you must have is the electric ruler, which is no more than a Power Distribution Unit. On GLPI, it is called PDU (Power Distribution Unit). The rulers have the function to distribute energy to the assets installed on the rack.There are several types, outlet quantities and resources, such as monitorable via network using the SNMP (Simple Network Management Protocol).
Creating PDUs on GLPI.
Since the 9.3 version, GLPI comes with the native possibility of registering PDUs in the system.This registration can be done with the following procedure:Step 1: Access “Main menu > Assets > PDUs”Step 2: Click on “Add items”Step 3: Add your PDU with its proper characteristics
Assembling racks on GLPI.
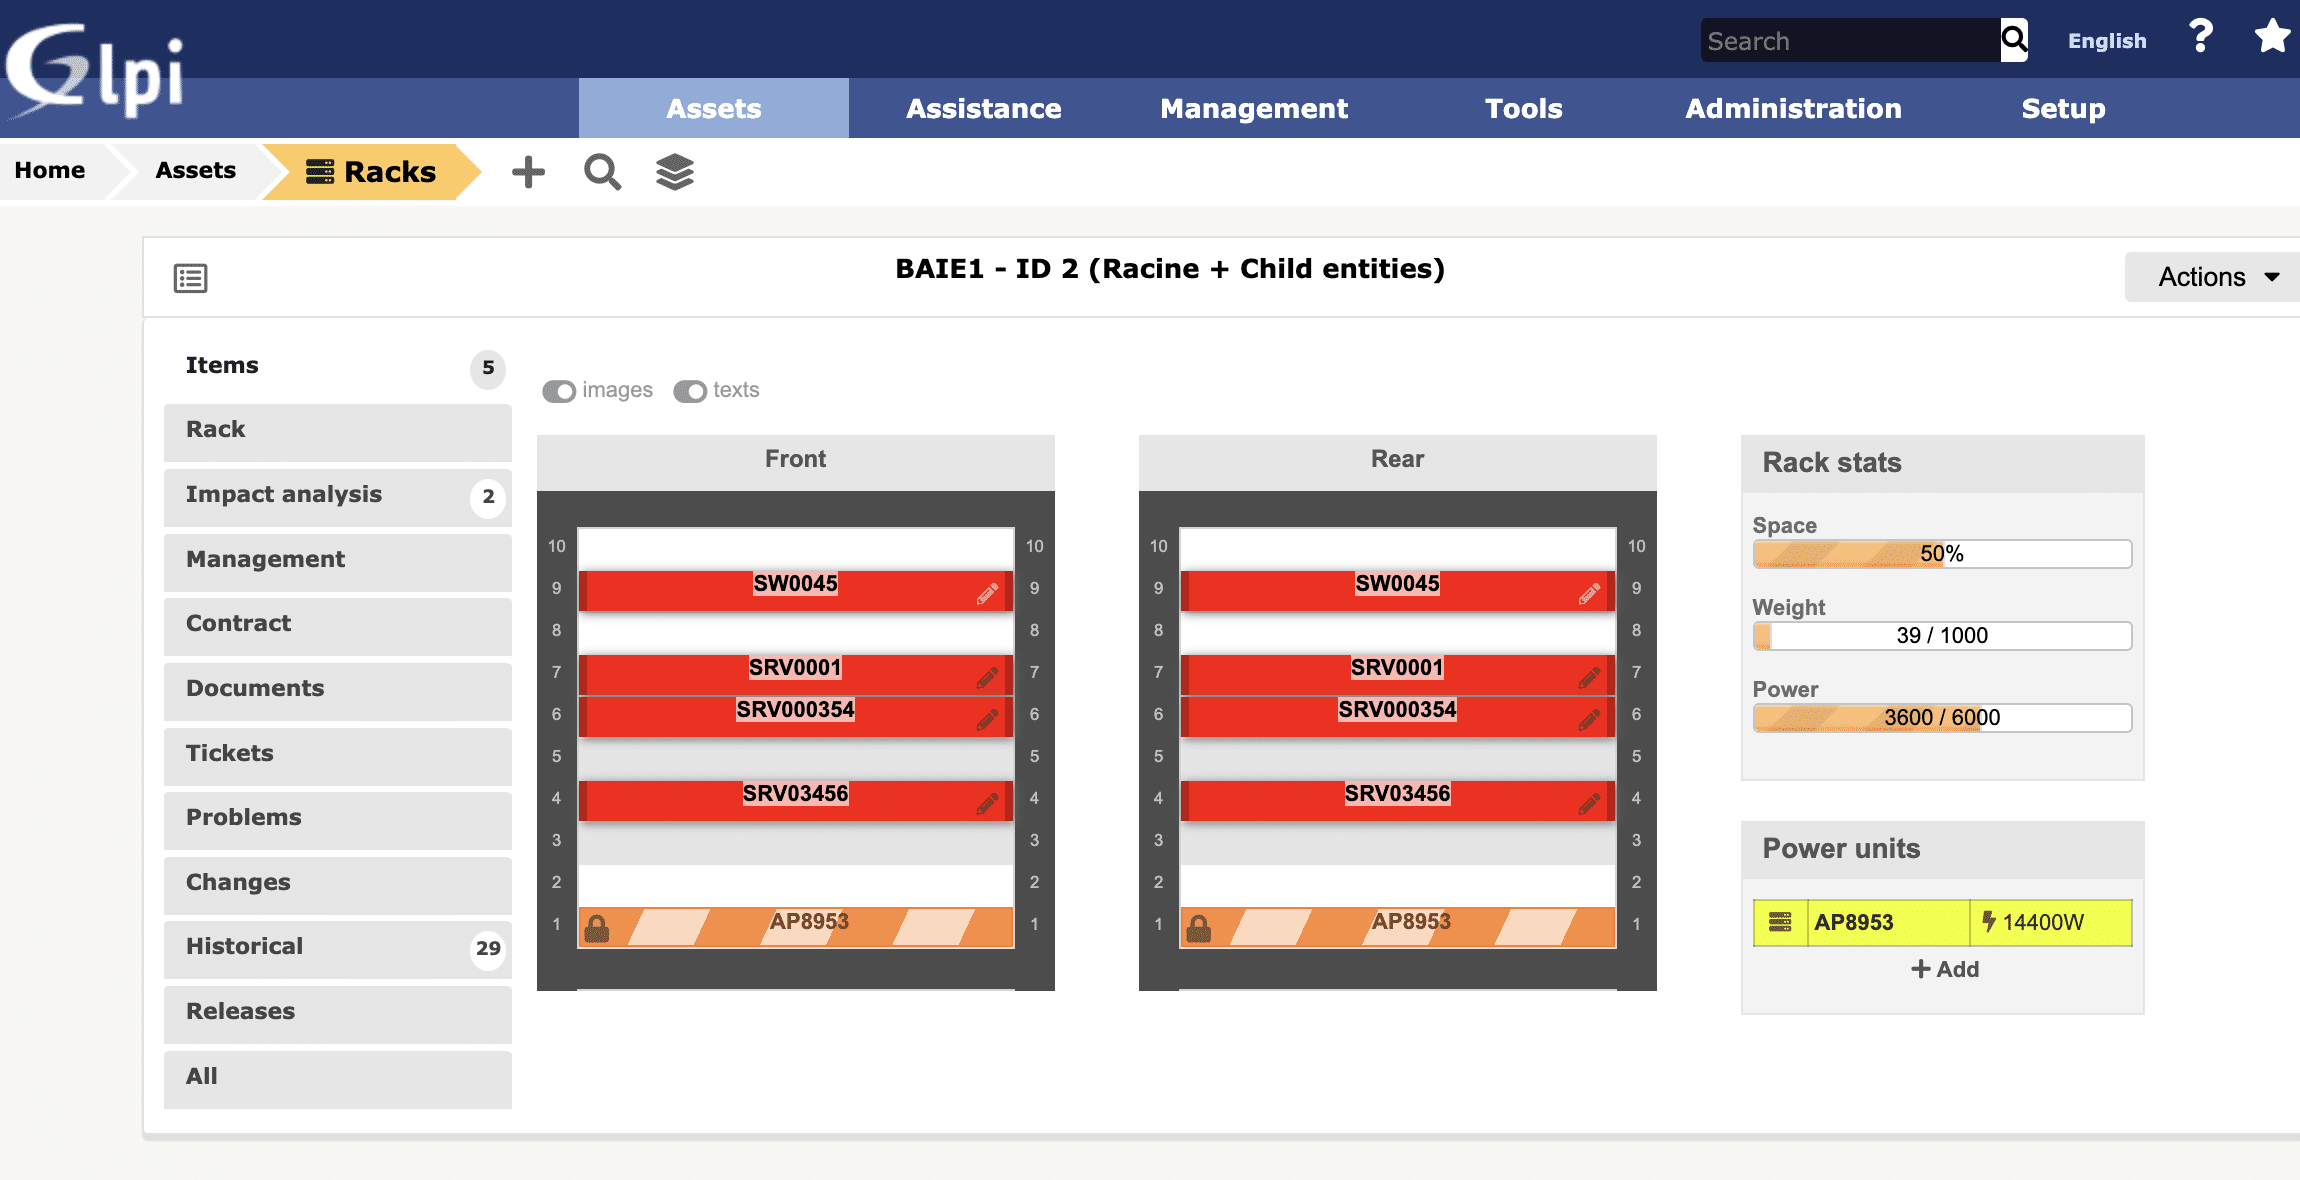
With GLPI we can assemble an image of our racks using the items we have in our configuration base and then have a great level of management over these items.
Adding a rack on GLPI
To create a rack, just access the system in “Main menu > Assets> racks”.Now, just click on “Add” to create your first rack on the system.
Data of the rack
After the rack’s registration, it will be available for us to “decorate” however we want.
Adding items to the rack on GLPI.
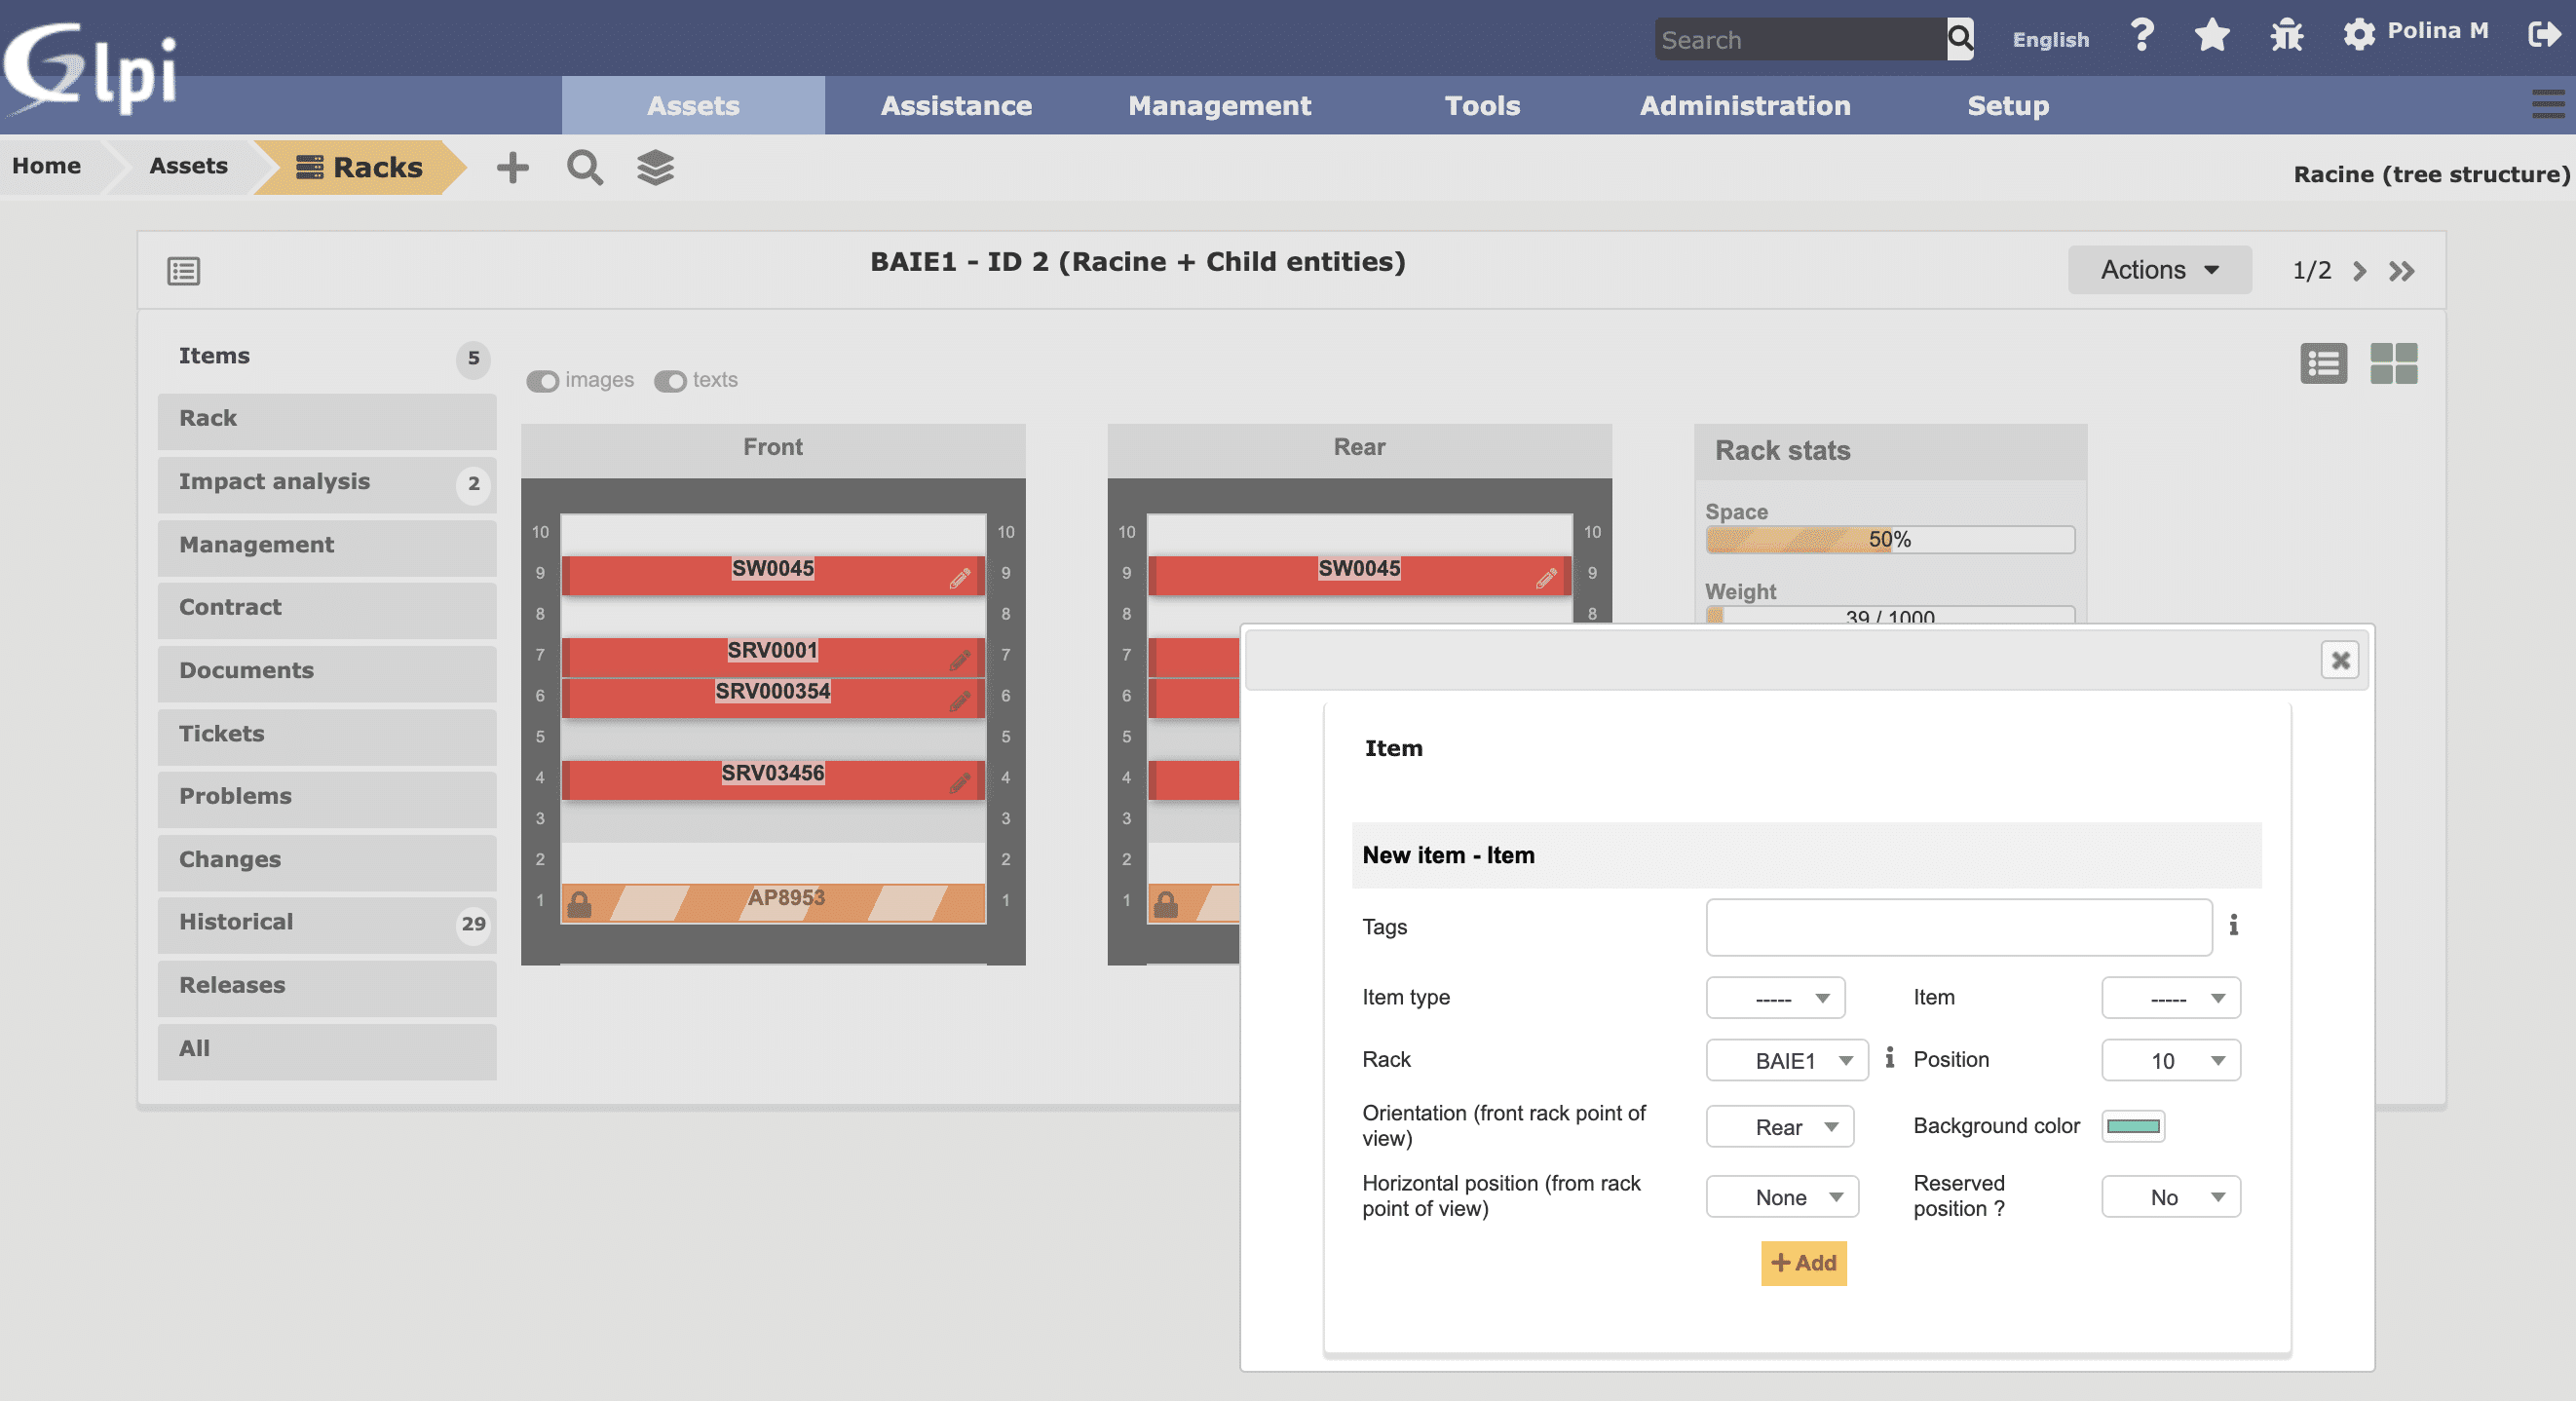
In order to provide a better experience, we’ll demonstrate the configuration of some of the items mentioned in this post.The first item we’ll add is the UPS. This equipment, as mentioned above, is heavier. Therefore, we’ll install it at the position 1 of the rack, leaving most of the weight concentrated in the inferior region of the rack.For that, just click at the center of unit 1 of the rack at the “plus” sign that appears when we pass the computer mouse over this region:A modal will open asking what kind of item we want to insert in the rack.The asset classes allowed for use by GLPI are:
Computer
Monitor
Network devices
Generic devices
Chassis
PDUs
Liability devices (Thank God the plug fell for the insertion of these items)
While selecting any of the classes, GLPI will list the assets for us to select one and install on the rack.After selecting the item, just click on “Add” and then you’ll have your asset installed.
You can proceed adding items to your rack.
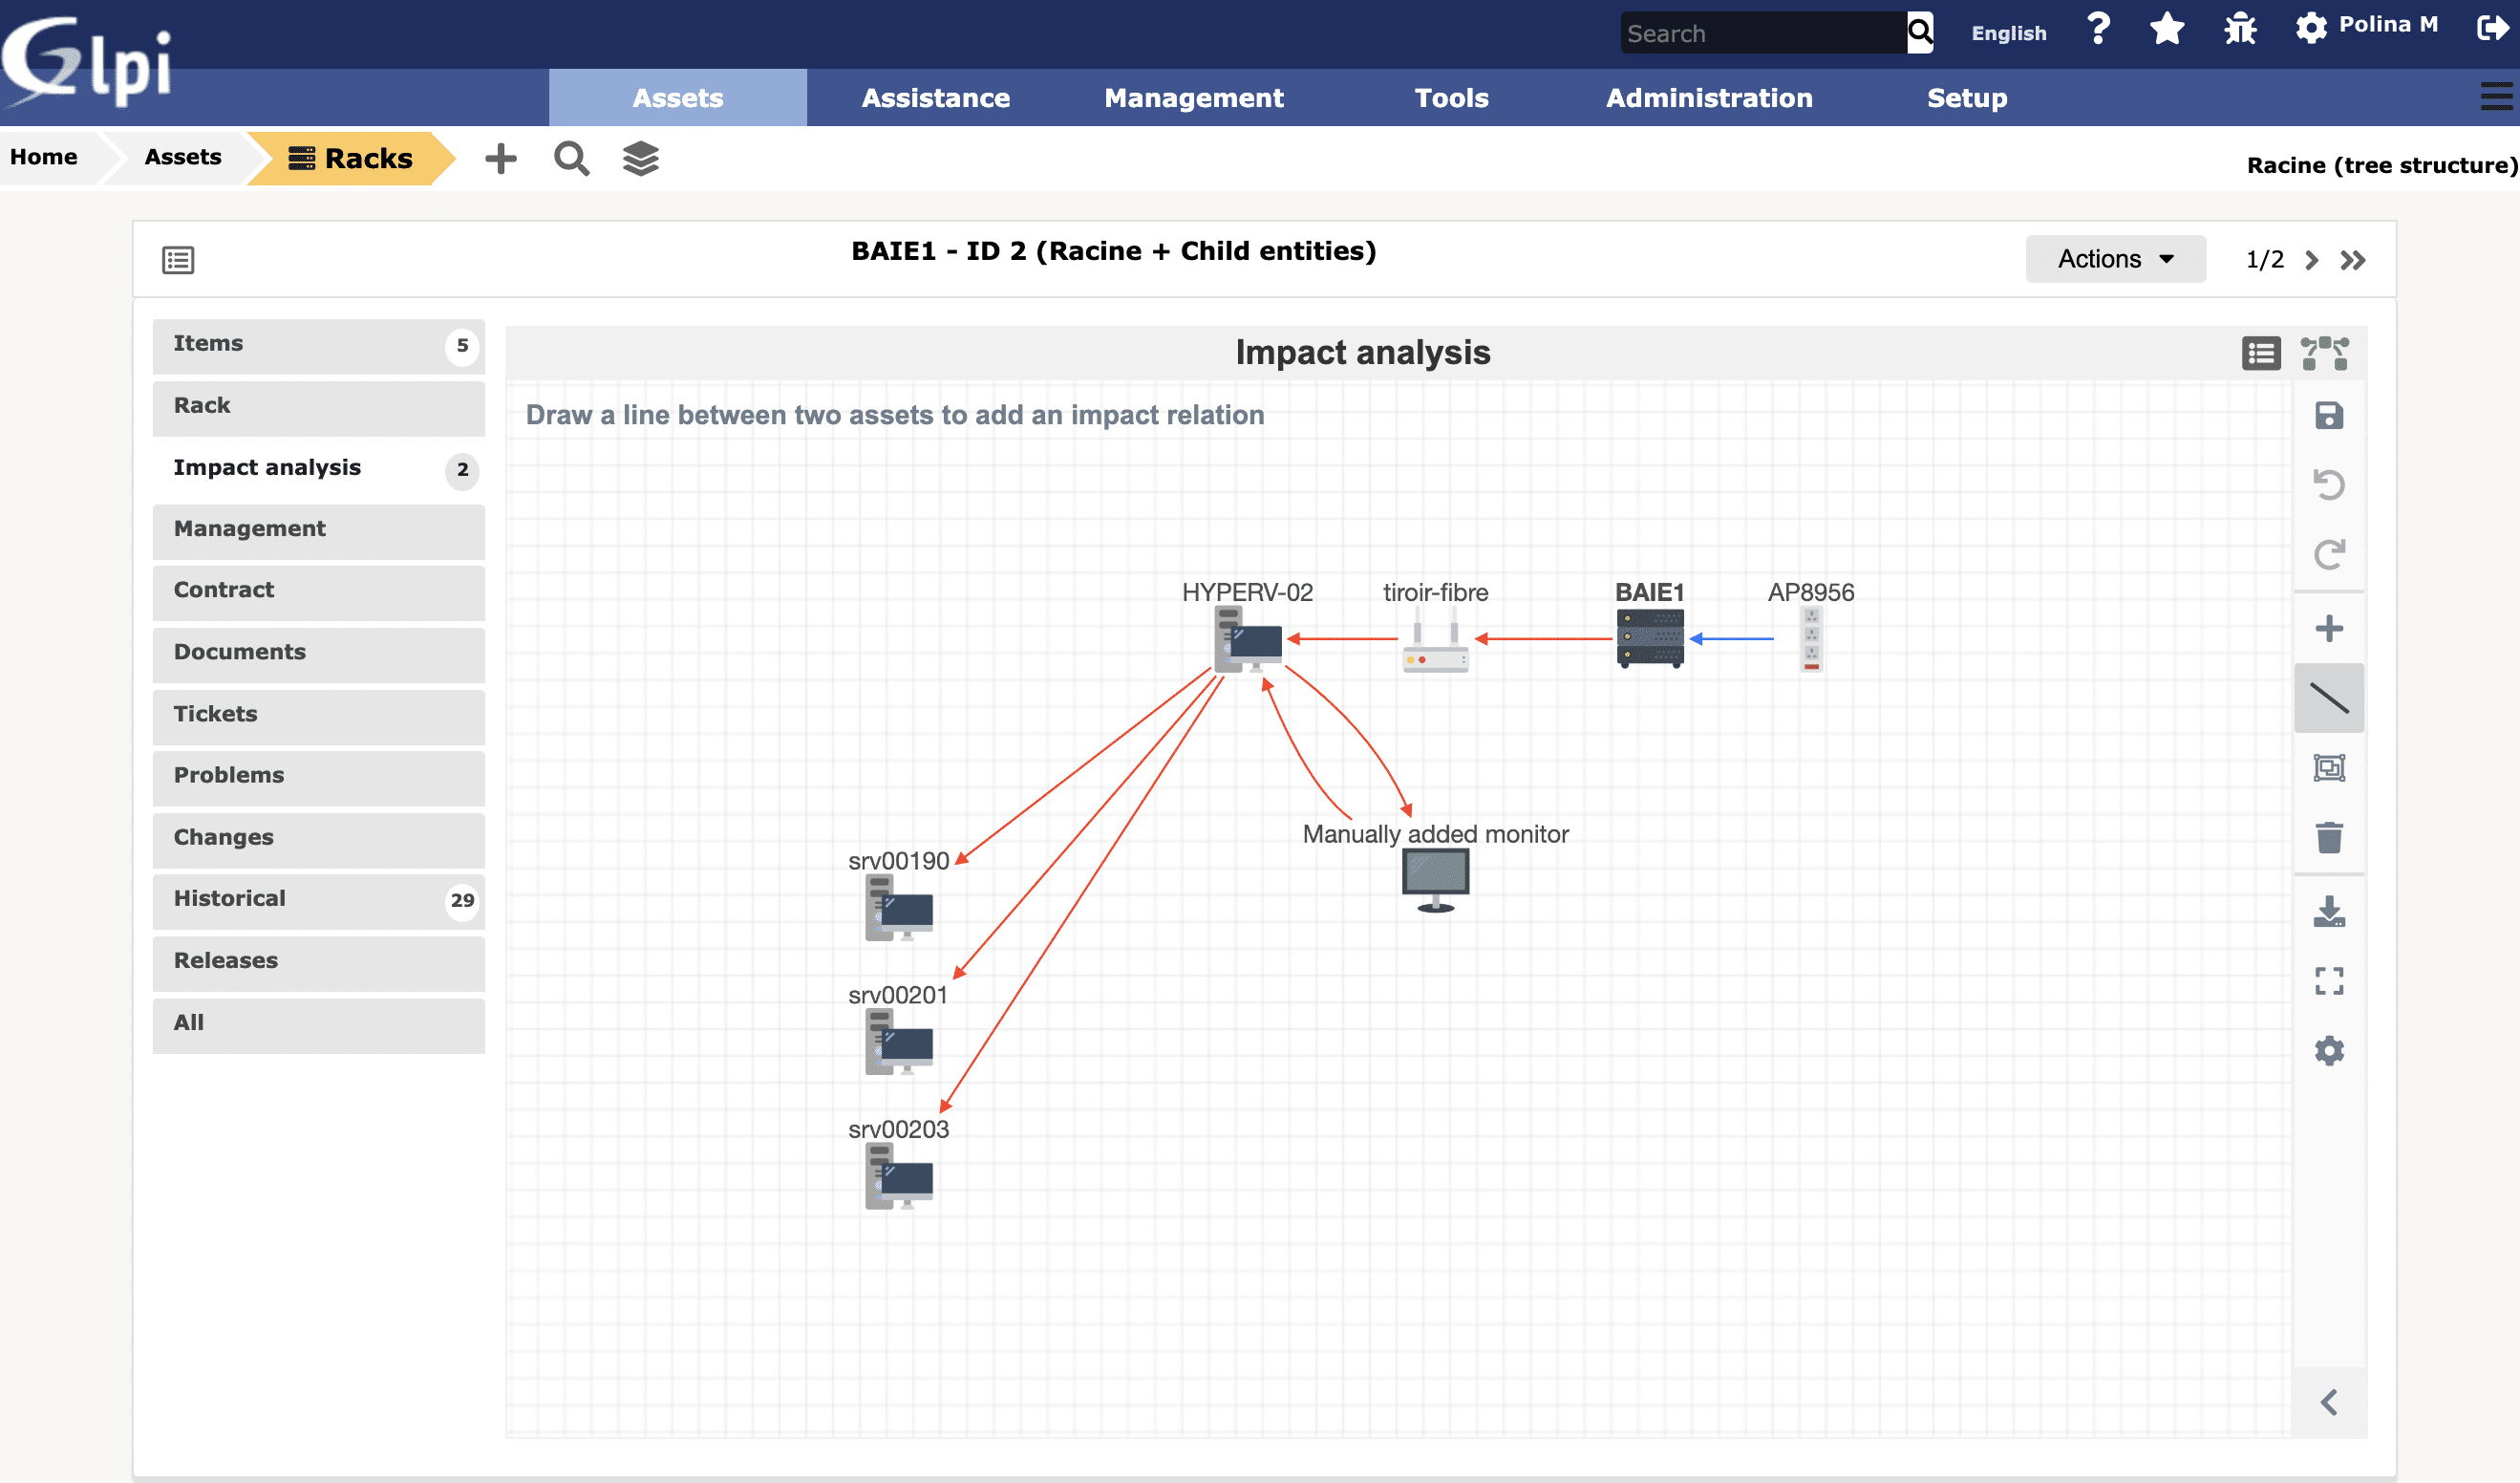
Impact & Relationship management.
Starting from GLPI 9.5 it is possible to create dependencies connection between assets. Now you can see which assets will be affected in case of damage/problems/incidents.
Translated from Portuguese to English by Laís Borges Dantas.
Formcreator plugin for GLPI is a plugin which allows to create custom forms of easy access. Using Formcreator in GLPI you can offer your users alternative way of ticket creation. All forms are completely translatable and wide selection of fields types is available. Today we are happy to announce the release of Formcreator plugin version 2.12.0 beta:
Meet the new feature: translatable forms! Now you can translate any form to any language without having to duplicate it. We have prepared the video to showcase the feature:
If you use anonymous forms, the plugin detects the language of the browser and attempts to use the suitable translation (if available).
Formcreator plugin for GLPI is a plugin which allows to create custom forms of easy access. Using Formcreator in GLPI you can offer your users alternative way of ticket creation. All forms are completely translatable and wide selection of fields types is available. Today we are happy to announce the release of Formcreator plugin version 2.11.4.
Pour offrir les meilleures expériences, nous utilisons des technologies telles que les cookies pour stocker et/ou accéder aux informations des appareils. Le fait de consentir à ces technologies nous permettra de traiter des données telles que le comportement de navigation ou les ID uniques sur ce site. Le fait de ne pas consentir ou de retirer son consentement peut avoir un effet négatif sur certaines caractéristiques et fonctions.
Fonctionnel
Always active
L’accès ou le stockage technique est strictement nécessaire dans la finalité d’intérêt légitime de permettre l’utilisation d’un service spécifique explicitement demandé par l’abonné ou l’utilisateur, ou dans le seul but d’effectuer la transmission d’une communication sur un réseau de communications électroniques.
Préférences
L’accès ou le stockage technique est nécessaire dans la finalité d’intérêt légitime de stocker des préférences qui ne sont pas demandées par l’abonné ou l’internaute.
Statistiques
Le stockage ou l’accès technique qui est utilisé exclusivement à des fins statistiques.Le stockage ou l’accès technique qui est utilisé exclusivement dans des finalités statistiques anonymes. En l’absence d’une assignation à comparaître, d’une conformité volontaire de la part de votre fournisseur d’accès à internet ou d’enregistrements supplémentaires provenant d’une tierce partie, les informations stockées ou extraites à cette seule fin ne peuvent généralement pas être utilisées pour vous identifier.
Marketing
L’accès ou le stockage technique est nécessaire pour créer des profils d’internautes afin d’envoyer des publicités, ou pour suivre l’utilisateur sur un site web ou sur plusieurs sites web ayant des finalités marketing similaires.
 A modal will open asking what kind of item we want to insert in the rack.The asset classes allowed for use by GLPI are: