Pour optimiser, il faut d’abord mesurer. GLPI centralise l'ensemble de vos données via l’Agent GLPI ou des protocoles standards (SNMP, WinRM, SSH). Ordinateurs, serveurs, routeurs et imprimantes sont répertoriés dans une plateforme unique.
Avec l'arrivée de GLPI 11, la gestion s'étend désormais aux "Custom Assets" : véhicules, équipements industriels ou infrastructures électriques. Si un actif a un coût et nécessite un suivi, GLPI en assure la traçabilité complète :
Découvrir les nouveautés de GLPI 11
Depuis 2024, GLPI participe au projet IEN (Impact Environnemental du Numérique) aux côtés de partenaires prestigieux comme Airbus, l'Afnic et Sorbonne Université. Le premier résultat ? GLPI Carbon. Le projet continuera d’évoluer jusqu’en 2027.
Ce plugin innovant s'appuie sur vos données d'inventaire pour calculer l'équivalent carbone de vos ordinateurs en se connectant à des bases de référence (Boavizta, RTE, Electricity Maps) :
L'intégration de GLPI Carbon permet aux entreprises de générer des indicateurs précis pour les certifications ISO 14000 et 14044. Vous pouvez désormais estimer le potentiel de réchauffement global (GWP) de votre flotte et identifier les leviers de réduction de votre empreinte carbone.
Adopter GLPI, c'est choisir une solution Open Source tournée vers l'avenir, alliant performance opérationnelle et responsabilité sociétale (RSE).
Prêt à mesurer l'impact de votre infrastructure ? Ne laissez plus vos données dormir dans des tableurs et passez à une gestion d'actifs intelligente et durable.
La sécurité des outils ITSM est cruciale, et GLPI ne fait pas exception. Pour protéger vos données et garantir la fiabilité de votre environnement IT, il est essentiel de maintenir votre GLPI à jour. C’est dans ce contexte qu’Orange Cyberdefense a lancé GLPwnMe, un projet dédié à l’audit et à l’amélioration de la sécurité de GLPI. Orange Cyberdefense launched GLPwnMe, a project dedicated to auditing and improving GLPI’s security.
GLPwnMe, porté par Orange Cyberdefense, est un outil automatisant la détection des principales failles précédemment déclarées de GLPI. L’objectif : identifier les vulnérabilités potentielles de votre instance avant qu’elles ne deviennent des risques pour les utilisateurs.
Chaque mise à jour de GLPI intègre non seulement de nouvelles fonctionnalités, mais aussi des correctifs de sécurité issus des audits comme ceux menés par Orange Cyberdefense. Ne pas mettre à jour votre instance GLPI peut exposer vos données et vos systèmes à des risques évitables.
Dans notre nouvelle vidéo GLPI x Orange Cyberdefense vous découvrirez les interventions de :
Regardez la vidéo : https://www.youtube.com/watch?v=0M37jnoJDEg
Ils expliquent comment la collaboration autour de GLPwnMe contribue à renforcer la sécurité de GLPI et pourquoi chaque utilisateur doit mettre à jour son logiciel régulièrement.
💡 Mettre à jour GLPI n’est pas seulement une question de nouvelles fonctionnalités : c’est protéger vos données, sécuriser votre environnement IT et renforcer la confiance de vos équipes.
Avec les images officielles Docker, déployer GLPI n'a jamais été aussi simple, que vous souhaitiez le tester rapidement ou l'exécuter en production.
L'exécution de GLPI dans Docker apporte des avantages clés :
Cette approche est conçue pour :
GLPI Avec Docker, vous pouvez exécuter GLPI en quelques commandes seulement.
👉 Pour un guide étape par étape, consultez notre tutoriel du centre d'aide.
Docker est le moyen le plus rapide d'explorer GLPI avec une configuration minimale. Que vous testiez la dernière version ou que vous déployiez un environnement stable en production, les conteneurs rendent le processus fluide et fiable.
Aujourd'hui, les technologies de l'information (TI) représentent 3 à 4 % des émissions mondiales de gaz à effet de serre (GES). Ce chiffre montre que le secteur des TI est déjà l'un des principaux contributeurs au changement climatique, et sa croissance continue ajoute un poids significatif. Pour atteindre la neutralité carbone d'ici 2050, il est essentiel de mesurer, comprendre, puis réduire l'impact environnemental de votre infrastructure numérique.
C'est pourquoi GLPI présente Carbon, un plugin conçu pour analyser le cycle de vie de vos actifs informatiques, évaluer leur impact et vous guider vers des choix plus durables.
Voici ce que le plugin GLPI Carbon vous permet de faire :
Avec GLPI Carbon, vous obtenez :
CloudInventory allows automatic and manual synchronization of resources hosted by various cloud providers (OVH, AWS, Azure, Google Cloud, etc.) into GLPI. It supports real-time discovery, cron task scheduling, API data visualization, reconciliation with GLPI assets, a summary dashboard, and integration with asset management rules.
Compatible with GLPI’s dynamic inventory via the agent, this plugin promotes centralized and consistent management of your hybrid infrastructure.
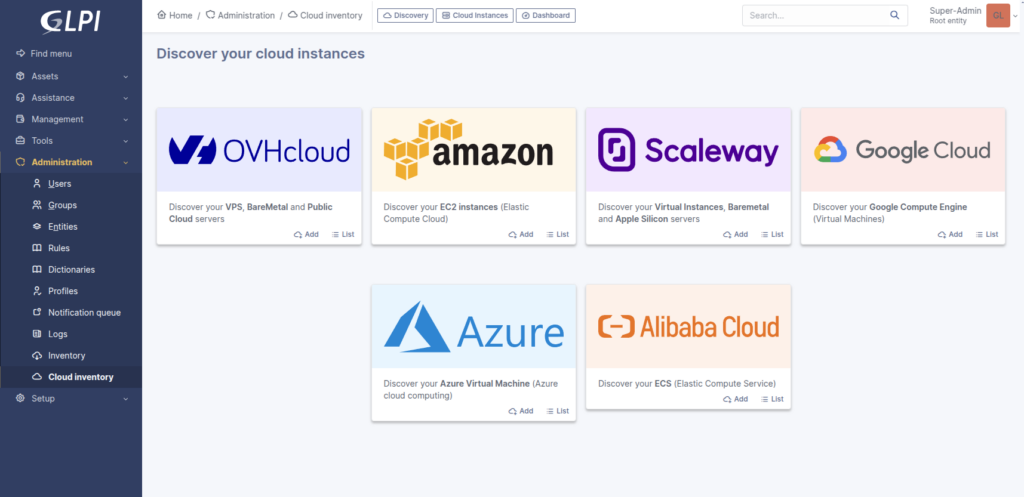
Discover the plugin at this link: https://plugins.glpi-project.org/#/plugin/cloudinventory
Explore all its benefits in the documentation: https://glpi-plugins.readthedocs.io/fr/latest/cloudinventory/index.html
We would like to announce a new exclusive GLPI Network plugin — GLPI-AI — Available at https://plugins.glpi-project.org/#/plugin/glpiai. It is now available for clients with a GLPI Network subscription (Basic, Standard, Advanced) and PHP version >= 8.1, and starting from April 22nd for all GLPI Cloud instances.
This plugin adds the ability to summarize the timeline items of tickets using the Open AI API.
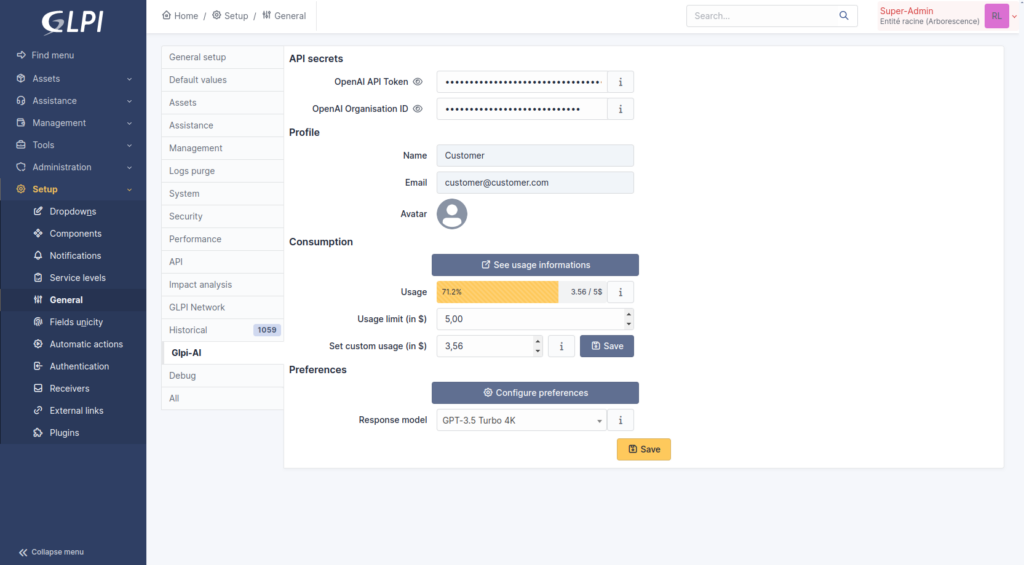
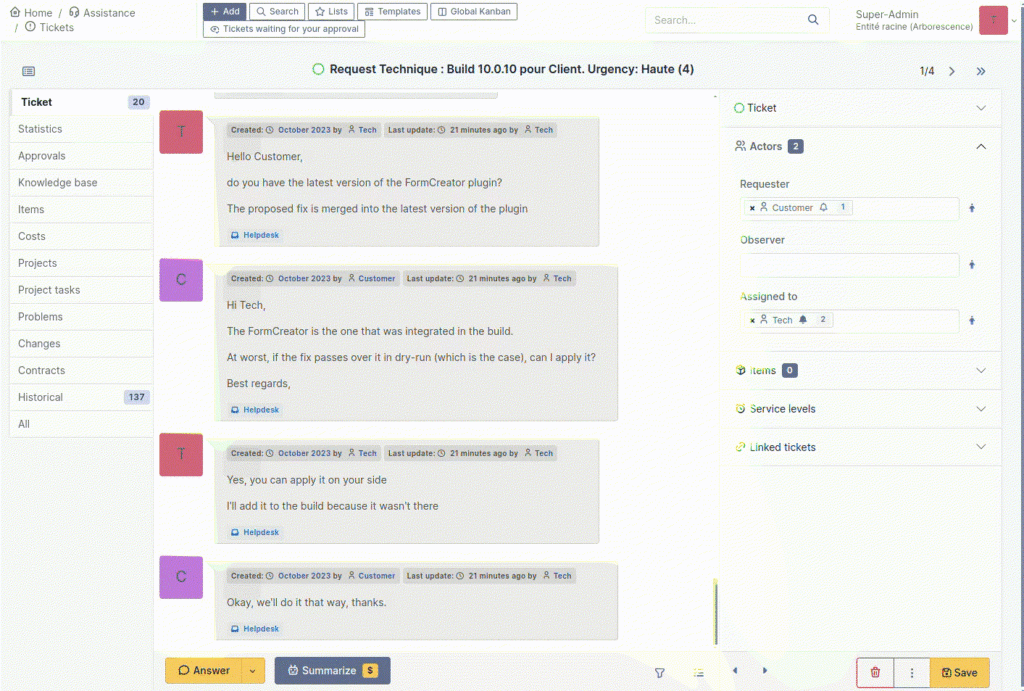
Find the documentation here: https://services.glpi-network.com/documentation/1864/file/README.md
View our brochure to find out more : https://glpi-project.org/wp-content/uploads/EN.pdf
GLPI AI is building on OpenAI

We would like to announce a new plugin — Centreon— available to all GLPI Network Cloud customers and for everyone with a marketplace registered (free tiers) !
The git repository is also open to everyone : https://github.com/pluginsGLPI/centreon
The plugin use the Centreon API to retrieve informations about hosts and display them in corresponding computers (matching the name).
The tab shows services informations with their statuses, and a timeline of events.
You can also send a few actions to the distant server like:
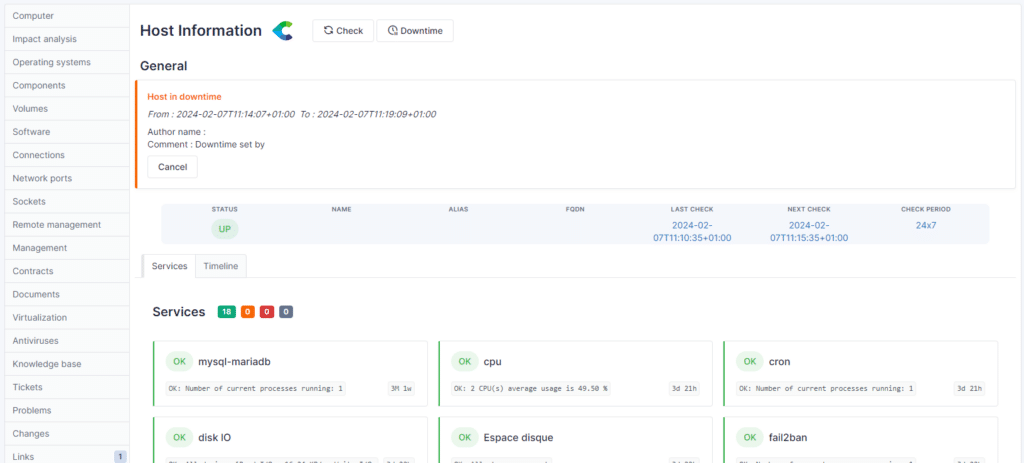
This is the first version of the plugin and we will continue to work on it and deliver more features (metrics, widgets for our dashboards, listing of all services, etc) soon.
Important announcement for the GLPI community regarding our GLPI Network Cloud offerings! We have decided to streamline our GLPI Network Cloud offers!
⚠️ GLPI Network Public Cloud remains unchanged (starting from 1 user, €19/user/month).
⚠️ Private Basic Cloud is now "Private Cloud" (starting from 25 users, €21/user/month).
⚠️ We no longer offer Private Advanced Cloud! Please contact us for a customized solution if you have more than 100 users!
We invite you to check out our new offers on our official GLPI Network Cloud website: https://glpi-network.cloud/prices/
For any questions or if you need a customized quote, feel free to contact us!
Collecting inventory data from servers, network devices, and workstations across your company is a challenging task. Initially, this process requires installing agents on every computer. However, there are common obstacles. Perhaps internal policies prevent agents from being installed on all servers, or there's no centralized installation method. Sometimes, networks are isolated, making it impossible to connect to your GLPI server, or you might simply need to collect data remotely from your network.
Additionally, consider the scenario where data collection is necessary from network devices and printers. This is where the GLPI Agent becomes invaluable. Since its 1.6 version, the GLPI Agent includes a Toolbox plugin. This plugin significantly expands your capabilities, allowing for network discovery and inventory of network devices using SNMP. It also facilitates remote data collection of hosts: Windows through WinRM, Linux via SSH, and ESXi.The beauty of the GLPI Agent lies in its versatility - all these functions are integrated into a single agent, simplifying what was once a complex and multifaceted task.All you need before starting is:
a. If you have many VLANs or want to segment the scans between tasks, you can separate the ranges following your company policies4. The list of SSH, WinRM and SNMP credentials with administration permissionsThe toolbox is not intended to be installed on insecure networks.
After we've gathered all this information, You can follow these steps contained in the video below:
a. You will need just the 4 menus that are on the documentation:i. Credentialsii. Inventoryiii. IP Rangesiv. Scheduling3. Create the IP ranges you want to discover and inventory devices remotely4. Register the SNMP credentials of your devices5. Register the SSH credentials of your devices6. Register the ESXi credentials - if you have them7. Create the scheduling you want GLPI Agent to run - if you want to do it recurrentlya. Even if you want the task to be run just once, we must create a schedule to add to the task8. Create an Inventory taska. If you set a huge network, you need to be aware that more time will be needed for the agent to finish its job.b. threads is the number of remote devices the task will query for at the same time.i. This can be set higher to make more requests at the same time and keep the task running in a shorter time.ii. The value must be reasonable, and the right value can depend on the resources allocated to the agent.c. timeout is the number of seconds before the agent will decide a remote device is not responding.i. On a local network with devices responding quickly, it can probably be set to 1 second.ii. On devices located behind a far network or if devices can be overloaded, this may require a higher value.iii. When have SSH authentication is included, 10s is better, so the agent can wait for the device to respond.9. Run the taska. If you activate the debug of the agent to the ID 2, which is the most complete debug mode, you will be able to watch each tentative of the agent to connect to each IP of the range.In this scenario, we are collecting just information about SNMP equipments, and Linux instances using SSH. For this lab and video, we are not collecting Windows information, even though it is possible if you enable WinRM connections from the host containing the GLPI Agent Toolbox and registering a WinRM credential to the configuration of the agent.
https://glpi-agent.readthedocs.io/en/latest/tasks/remote-inventory.htmlhttps://glpi-agent.readthedocs.io/en/latest/plugins/basic-authentication-server-plugin.htmlhttps://glpi-agent.readthedocs.io/en/latest/plugins/ssl-server-plugin.htmlhttps://glpi-agent.readthedocs.io/en/latest/plugins/toolbox-plugin.html#setupGLPI Agent Toolbox
We would like to announce a new plugin — Unread — available to all GLPI Network Cloud customers and via our professional offers starting on the Basic GLPI Network Subscription (on-premises) and above !
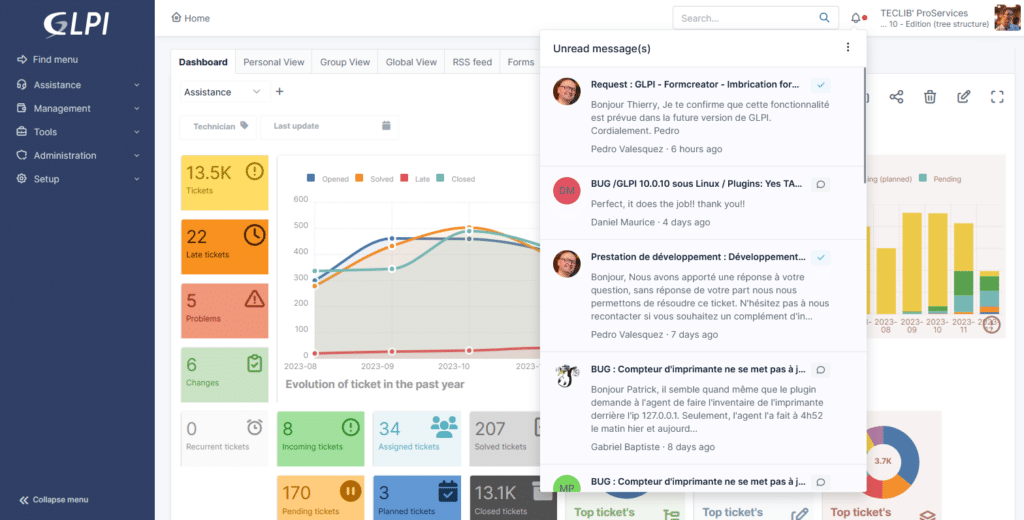
This plugin helps you to keep track of unread messages while you were offline and don’t want to miss ant messages that could have be sent, and you should be aware of.
The plugin adds a new notification bell in the top right corner so you can keep track of everything you need to. This notification bell list all your unread messages.
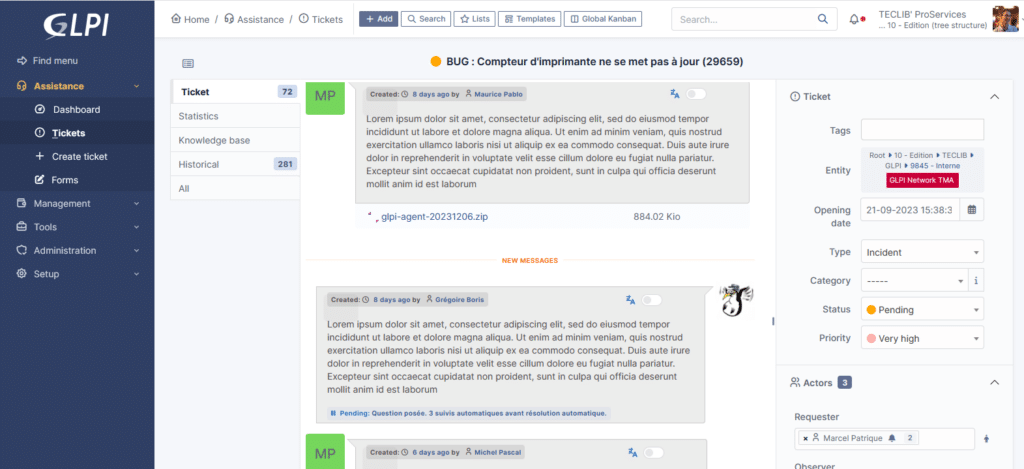
The timeline indicator adds a line below the last item you have read on THE tickets’ timeline. So now it’s possible to come back to work knowing exactly where you stopped before.
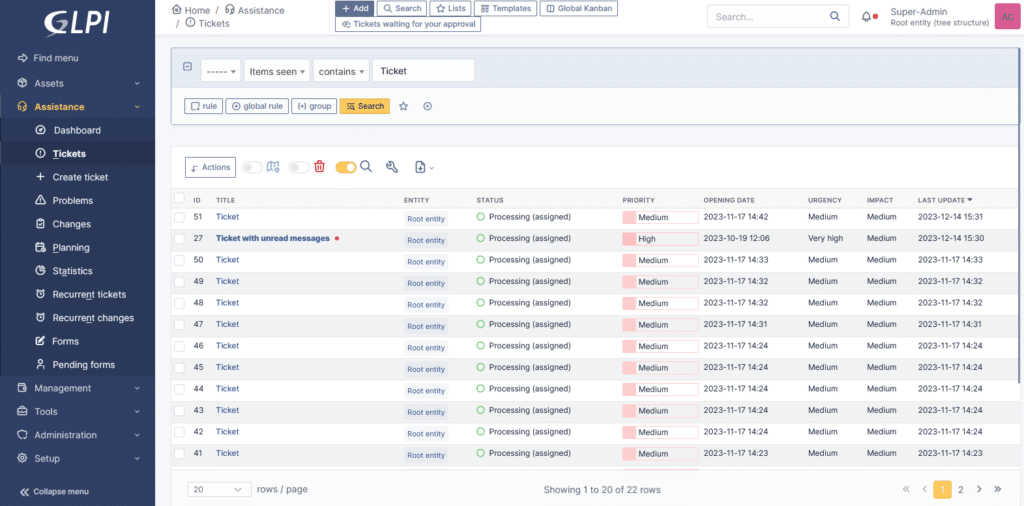
When you open the ticket list, all the tickets with unread messages are highlighted, and you can choose the one you want to know more about.
Find the subscription brochure here: https://glpi-project.org/wp-content/uploads/EN.pdf
On GLPI Network Cloud: https://glpi-network.cloud/
Documentation for this plugin can be found by clicking this link: https://plugins.glpi-project.org/#/plugin/unread
You can test this plugin (and all other GLPI Network plugins) on your GLPI Network Cloud demo instance.